Sunday, October 29, 2017

Crusty Baked Shells & Cauliflower


Mom and I went to the County Fair every summer. I was going for the rides, the animals, and the food. She was going for my sake, but also because a basket of fried veggies was one of her favorite things to eat. Back in the day we were very healthy eaters, so these battered and fried veggies were a big treat for both of us. The basket would come out piping hot and brimming with golden puffy clouds of broccoli, mushrooms, onions, zucchini, and cauliflower. She loved them all, but she loved the mushrooms best. This worked in her favor since I didn't like mushrooms. The onions and cauliflower were always my favorites. Together we would eat the basket clean.

A few weeks ago I went to a street fair and there were rows upon rows of food trucks. There were endless things to eat, but I only had one thing in mind: fried veggies.  Problem was, I looked high and low and no one seemed to be selling them. Determined, I walked around in the hot sun for what felt like ages. Finally I find a place and my eyes lit up. I went ahead and ordered the big basket, even though no one would share them with me.

Even though I had to hold back tears, I did manage to thoroughly enjoy those fried veggies. To me they will always be the best thing to eat at the fair. The onion is still up there as one of my favorites, but it's the fried cauliflower that's my favorite. I love all the craggy fried edges and how the cauliflower starts to go all creamy inside. It's just so darn good! The whole thing got me thinking...why don't I cook with cauliflower more often?

I vowed then and there to buy some cauliflower and find a good recipe. While looking through Ina Garten's latest cookbook, Cooking For Jeffrey, I found this recipe for Crusty Baked Shells & Cauliflower and it was perfect!

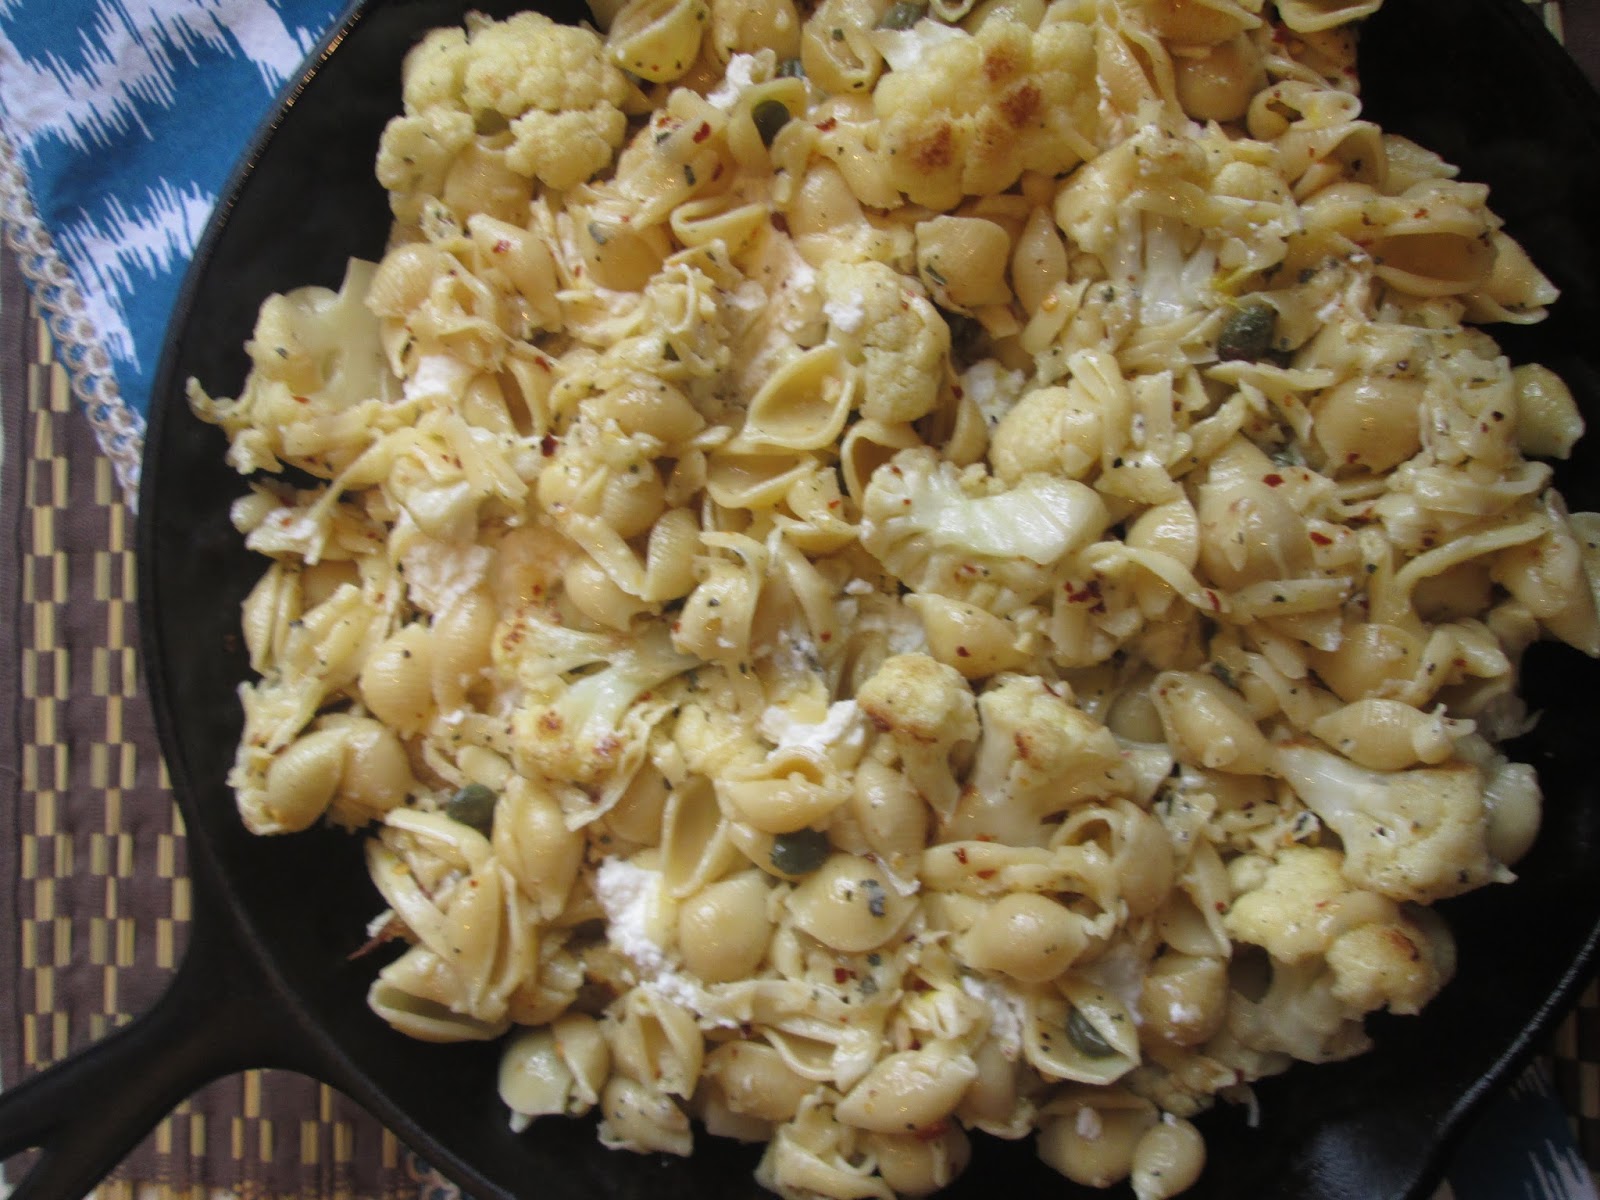
This baked pasta dish is delightfully different. First of all, there is no cheese sauce, but there is plenty of cheese: creamy Fontina, fluffy ricotta, and nutty Pecorino. These three cheeses may very well be the foundation of this dish, but it's the brightness of the lemon zest and the pop of the capers that are front and center. Of course, I'd be remiss if I didn't give mention to the real star of the dish, the crusty panko topping. The topping is a textural delight, with crusty bits of panko, pasta, and cauliflower. Oh, and I nearly forgot to mention the fiery heat of the red pepper flakes! I really loved this. It was just plain fun to eat! While it may not be for everyone (a quick poll taught me that not everyone loves cauliflower), I will say that I found it absolutely delightful! I can understand why Ina says it is wildly popular. It is creamy and crusty, comforting yet bright, mild yet fiery and everything else in between. My favorite bites were the ones with the crusty bits from the top and the pasta shells that had capers tucked into them. So tasty, so unique!

Pasta and cauliflower mixed with lemon zest, capers, sage, garlic, Fontina, red pepper flakes, salt, and pepper

 If you love the ingredients in this one I urge you to give this a try! It is definitely one of those dishes that shakes things up a bit!


Crusty Baked Shells & Cauliflower
Adapted from Cooking For Jeffrey
by Ina Garten
Serves 6-8

Ina says, "When I met David Tanis in Paris, he was the head chef at Alice Water's legendary restaurant Chez Panisse in Berkeley, California. David now writes cookbooks andmy favorite food column in the New York Times. This wildly popular recipe is from his column. I love the creamy cauliflower with the crisp pasta plus sage, capers, garlic, and Fontina."

Before the topping was scattered on
Ingredients

3/4 pound medium shells
good olive oil
salt and pepper, to taste
2-1/2 pounds cauliflower, cut into small florets (1 large head)
3 tablespoons roughly chopped fresh sage leaves
2 tablespoons capers, drained
1 tablespoon minced garlic (3 cloves)
1/2 teaspoon grated lemon zest
1/4 teaspoon crushed red pepper flakes
2 cups freshly grated Fontina cheese (10 ounces with rind)
1 cup (8 ounces fresh ricotta)
1/2 cup panko
6 tablespoons freshly grated Pecorino cheese
2 tablespoons minced fresh parsley leaves

Preheat the oven to 400 degrees.

Fill a large pot with water, add 2 tablespoons salt, and bring to a boil. Add the pasta and cook al dente, according to the instructions on the package. Since it will be baked later, don't overcook it! Drain and pour into a very large bowl.

Meanwhile, heat 3 tablespoons of olive oil in a large (12-inch) saute pan over medium-high heat, add half the cauliflower in one layer, and saute for 5 to 6 minutes, tossing occasionally, until the florets are lightly browned and tender. Pour the cauliflower, including the small bits, into the bowl with the pasta. Add 3 more tablespoons of oil to the saute pan, add the remaining cauliflower, cook until browned and tender, and add to the bowl. 

Add the sage, capers, garlic, lemon zest, red pepper flakes, 2 teaspoons salt, and 1 teaspoon black pepper to the bowl and stir carefully. Stir in the Fontina. Transfer half of the mixture to a 10 x 13 x 2-inch rectangular baking dish (or cast iron skillet). Spoon rounded tablespoons of ricotta on the pasta and spoon the remaining pasta mixture on top. Combine the panko, Pecorino, parsley, and 1 tablespoon of olive oil in a small bowl and sprinkle it evenly on top. Bake for 25 to 30 minutes, until browned  and crusty on top. Serve hot!


Sunday, October 22, 2017

Ina Garten's French Chocolate Bark {Perfect for Halloween}


If I had I had a dollar for every time I've heard Ina Garten declare "How Easy Is That?" then I would have a fat stack of bills in my wallet. Ina repeats this catch phrase over and over again on her hit cooking show, but what's more is that she actually proves it, by showing us how easy it is to cook her five star dishes.

This recipe for French Chocolate Bark is an example of just how foolproof and easy Ina's recipes are. A handful of quality ingredients, a set of simple instructions, and voilĂ  ...you have yourself a five-star chocolate bark that would rival anything you could find at an upscale chocolate shop!

This chocolate bark calls my name with all the delicious toppings: roasted and salted cashews, sweet dried cherries, and beautiful orange dried apricots. The colors just scream Halloween to me and makes this perfect for taking to any upcoming Halloween celebrations. The textures and flavors are out of this world: crunchy and salty cashews with sweet and chewy bits of dried fruit and creamy chocolate. Wow! Your taste buds are in for a special treat with this one!


French Chocolate Bark
Adapted from Back To Basics
by Ina Garten
Makes 18 to 20 pieces

1 cup whole salted, roasted cashews
6 to 7 ounces very good semisweet chocolate, finely chopped
6 to 7 ounces very good bittersweet chocolate, finely chopped
1/4 cup dried crystallized ginger, 1/2-inch diced*
1/2 cup dried cherries
1/2 cup dried apricots, 1/2-inch diced
1/4 cup golden raisins

*Note: I omitted the crystallized ginger and raisins simply because I didn't have them on hand. I used Ghiradelli chocolate with great results.

Preheat the oven to 350F. Using a pencil, draw a 9 x 10-inch rectangle on a piece of parchment paper placed on a sheet pan, then turn the parchment paper over. 

Spread the cashews in one layer on another sheet pan and bake for 8 minutes. Set aside to cool.  

Place the semisweet chocolate and half the bittersweet chocolate in a glass bowl and microwave on high power for 20 to 30 seconds. (Don't trust your microwave timer; time it with your watch.) Stir with a rubber spatula. Continue to heat and stir in 30-second increments until the chocolate is just melted. Immediately add the remaining bittersweet chocolate and allow it to sit at room temperature, stirring often, until it's completely smooth. Stir vigorously until the chocolate is smooth and slightly cooled; stirring makes it glossier.

Pour the melted chocolate onto the parchment paper and spread it lightly into the drawn rectangle. Sprinkle the top evenly in the following order; first the ginger, then the cooled whole cashews, the cherries, apricots, and raisins. Set aside for 1 to 2hours until firm. Cut the bark in 18 to 20 pieces and serve at room temperature.


Sunday, October 15, 2017

Ina Garten's Engagement Roast Chicken {The Very Best Roast Chicken}


Long time watchers of  Ina Garten's cooking show, Barefoot Contessa, know that she is The Queen of Roast Chicken.  Ina has many recipes for roast chicken and countless others celebrating chicken. Her inspiration behind these recipes is her husband, Jeffrey. Chicken is Jeffrey's favorite and Jeffrey is Ina's favorite.

These two things, Ina's love of Jeffrey and therefore chicken, are apparent to anyone who catches a few segments of her tv show. In fact, my husband has surmised as much after only seeing a few snippets here and there. It's so evident that for years we've had a running joke about Ina and Jeffrey and Friday night chicken dinners.
 
Weeks ago my husband called me laughing when he saw the text that my newest cookbook, Cooking For Jeffrey was set to arrive in the mail. He said, "it's about time she wrote a book dedicated to cooking for Jeffrey." So, my husband was delighted when on Friday I sent him a text to let him know that I was making Ina's Roast Chicken for dinner, Jeffrey's favorite. Let's just say he had high expectations because he knows that Jeffrey gets only the best!

This recipe started off just like all the rest, but Ina throws a few wise tips in. Namely, the size of the pan and the reason why it's so important. The chicken is nestled with two sliced onions and lemon wedges. The pan needs to be somewhat of a tight fit or the onions will burn. This was most helpful for me because in the past my add ins (onions, garlic, lemon, potatoes, carrots, etc) have all been in a pan that was too large which resulted in burning and scorched tasting gravy, etc. The second, and equally helpful tip, was to cut the slices of onion thick so that they would hold up in the oven. The result was perfectly cooked onions and delicious gravy. Score!


Ina says to use a 9 x 11 roasting pan and you can definitely do that, but I prefer to use my cast iron whenever possible so I went ahead and used my 12" cast iron skillet. It was the perfect fit!

There is a reason why this chicken is called Engagement Roast Chicken. The word is that the chicken is so delicious it earns marriage proposals! While I think that is somewhat of an exaggeration, I can understand the name. This is quite simply THE VERY BEST ROAST CHICKEN I've ever made! We found this to be the ultimate in chicken, tender and juicy with a perfectly crisp and golden brown skin. The onion gravy is equally delicious, with a fresh pop from the lemon, and really elevates the chicken to another level. All in all, this was divine, exceeding all expectations. From now on, this is my one and only roast chicken recipe. Five stars, Ina!


Engagement Roast Chicken
Recipe found on Food Network
by Ina Garten
Serves 4

1 (4 to 5 pound) roasting chicken
salt and black pepper, to taste
2 lemons
1 whole head garlic, cut in 1/2 crosswise
good olive oil
2 onions, peeled and thickly sliced
1/2 cup dry white wine
1/2 cup chicken stock, preferably homemade
1 tablespoon all-purpose flour

Preheat the oven to 425F.

Remove and discard the chicken giblets. Pat the outside dry.  Liberally salt and pepper the inside of the chicken. Cut the lemons in quarters, place 2 quarters in the chicken along with the garlic and reserve the rest of the lemons.  Brush the outside of the chicken with olive oil and sprinkle the chicken liberally with salt and pepper. Tie the legs together with kitchen string and tuck the wing tips under the body of the chicken.  Place the chicken in a small (11 by 14") roasting pan (if the pan is too large the onions will burn - I used a 12" cast iron skillet). Place the reserved lemons and the sliced onions in a large bowl and toss with 2 tablespoons of olive oil, then season with salt and pepper, to taste. Pour the mixture around the chicken in the pan.

Roast the chicken for about 1 hour and 15 minutes, until the juices run clear when you cut between a leg and a thigh. Remove the chicken to a platter, cover with foil, and allow to rest for 10 minutes while you prepare the sauce, leaving the lemons and onions in the pan. 

Place the pan on top of the stove and turn the heat to medium-high. Add the wine (I didn't have wine so I subbed in extra chicken broth in it's place) and stir with a wooden spoon to scrape up the brown bits. Add the stock and sprinkle on the flour, stirring constantly for a minute, until the sauce thickens. Add any juices that collect onto a platter and serve with the lemons, onions, and warm sauce.


Cooking with Alliums @ IHCC

Sunday, October 8, 2017

Ina Garten's Cheese Straws {For Mom}


I started my cooking blog almost ten years ago and my mom was with me, tasting and testing recipes, every step of the way. Rightly so, because she was the reason I loved cooking to start with. She had me working beside her in the kitchen as soon as I was able to stand. My short legs were no match for the counter, so for years she kept my little stool by the kitchen counter so I could sprinkle salt and pepper, roll dough, and cut with my plastic knife. 


When I was a bit older and could reach the counter on my own, I can remember asking question after question. "Mom, can we add this spice? Can we add that spice?" She would always say, "We can add whatever we want because it's our kitchen and we make the rules." Cooking was art and the kitchen was our studio.


Like many women of her generation, my mom was never really one to follow a recipe. She never set a timer or made a recipe the same way twice. In fact, she was this way in all aspects of life, not just in the kitchen. She always said, "I like to walk my own path" and boy oh boy was she right about that. On the other hand, I've always been one to follow the rules and so we would banter back and forth, all in fun. She would tell me to loosen up and not be so straight and I would suggest that she set a timer or write her recipes down so that I would know how to duplicate them in the future. We would always meet somewhere in the middle. A perfect balance.  

Over the years we cooked side by side, sharing recipe after recipe. When my husband and kids snarled their nose at some of the dishes I made, because they were too fancy or had ingredients they didn't like, mom was always there. She was never picky and always gave compliments on everything that came out of my kitchen. My biggest fan. My best recipe taster, always encouraging me to try everything. On an off chance that she didn't like a dish, she always had kind and constructive feedback and we would always laugh and joke and talk about how our failures were always our biggest lessons.


A few weeks ago my mom, who was so full of life, lost her battle with cancer. She was only 64. I am so sad that our time was cut short, but am beyond thankful for all the time that we did have. I know that we lived it well, together. There are no words to express how very much I will miss her, and all of our kitchen adventures. My last promise to her was that I would be okay, and one of the best ways I can think to honor that promise, is to keep writing this blog. So keep cooking I must.

I chose this recipe because mom and I both loved cheese and anything bready.  I can see her now using Ina's recipe as a guideline and telling me that she was going to use more cheese and seasoning than the recipe called for because she liked to be a rebel. So more cheese and more seasoning it is, because I know that would make mom smile. I also decided that I didn't want to season the straws with thyme so I swapped out the thyme for Italian seasoning and red pepper flakes. Oh, and I didn't thaw the puff pastry overnight in the fridge either.  I thawed it right on the counter, last minute. How's that for being a rebel?

The results were delicious and we all enjoyed them. The only problem is that we have leftovers and that, my friends, is going to take some time to get used to.


Cheese Straws
Adapted from Food Network
by Ina Garten
Makes 22 to 24 cheese straws

2 sheets (1 box) frozen puff pastry (such as Pepperidge farm), defrosted overnight in the fridge
1 extra-large egg
1 tablespoon water
1/2 cup fresh grated Parmesan*
1 cup finely grated Gruyere cheese*
1 teaspoon minced fresh thyme leaves*
1 teaspoon salt
fresh ground pepper, to taste

*Note: Feel free to swap out the cheese and the seasoning in order to suit your taste buds. I used Parmesan and Gruyere because they're my favorites. However, I swapped the fresh thyme for Italian seasoning on one batch and red pepper flakes for the other. Half of the fun in this recipe is making different versions every time.

Preheat oven to 375F.

Roll out each sheet of puff pastry on a lightly floured board until it is 10 x 12 inches. Beat the egg with 1 tablespoon of water and brush the surface of the pastry. Sprinkle each sheet evenly with 1/4 cup of the Parmesan and 1/2 cup of the Gruyere, 1/2 teaspoon of the thyme, and 1/2 teaspoon of salt and pepper, to taste. With the rolling pin, lightly press the flavorings into the puff pastry. Cut each sheet crosswise with a floured knife or pizza wheel into 11 or 12 strips. Twist each strip and lay on baking sheets lined with parchment paper.

Bake for 10 to 15 minutes, or until lightly browned and puffed. Turn each straw and bake for another 2 minutes. Don't over bake or the cheese will burn. Cool and serve and room temperature.