Sunday, July 31, 2016

Strawberry, Lemon, & Basil Mimosa

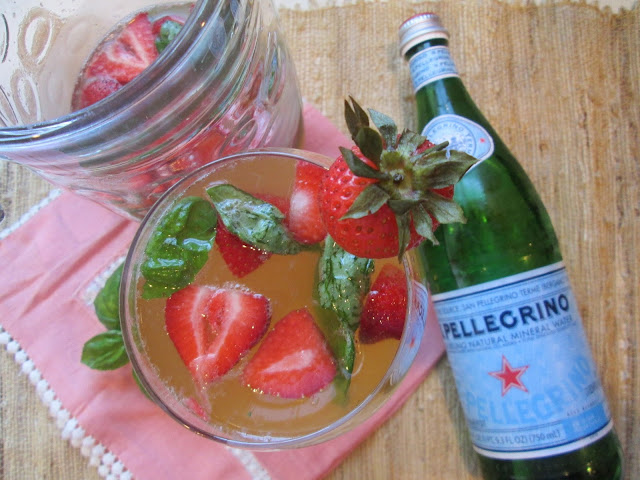
Sunday brunch calls for a special drink. A mimosa with a twist. Instead of the typical orange mimosa, this is a Strawberry, Lemon, & Basil Mimosa. Sliced strawberries, lots of fresh basil, lemon juice, honey, a bottle of Prosecco, and a little sparkling water and you are in for one light and bubbly summer refresher.

Sip after sip of this sweet drink reveals a lovely and somewhat intoxicating basil fragrance. A delightful drink that would pair well with many dishes. I can see this being a hit at any ladies function, or perhaps perfect for some front porch sipping, and/or maybe even a picnic.


Strawberry, Lemon & Basil Mimosa
Adapted from Food Network
by Giada De Laurentiis
Serves 4-6

3/4 cup packed fresh basil leaves
Juice from 2 large lemons (about 1/2 cup fresh lemon juice)
1/2 cup agave or honey
8 medium fresh or frozen strawberries, thawed and sliced
One 750ml bottle Prosecco, chilled
1/2 cup soda water or sparkling water, chilled

Combine the basil, lemon juice and agave in a pitcher. Using a wooden spoon, lightly crush the basil. Stir in the strawberries, Prosecco and soda water. Pour into chilled champagne glasses and serve.
 
Theme: July Potluck!

Sunday, July 24, 2016

Curtis Stone's Whole Roasted Chicken with Tomato-Basil Butter


Tomato-Basil Butter...doesn't that just sound like something you could slather on about anything? I can see it now on pasta, toast, biscuits, baked potatoes, grilled cheese, corn, chicken, so many ideas. Good thing it is tomato season.

I spied this recipe months ago and I filed it away for late July/August when fresh, ripe, juicy tomatoes are everywhere. Every time I paged through my Curtis Stone cookbook, What's For Dinner?, his Whole Roasted Chicken with Tomato-Basil Butter called to me. I could practically envision everyone smiling and happy at the dinner table.

As usual, I was right. This was an incredible chicken dinner! The tomato-basil butter keeps the chicken moist, helps to create a crispy delicious skin, and adds a fresh summery flavor. The remaining tomato jam makes for a lovely accompaniment. I was hoping for some leftover chicken, but it was picked clean. Much to my disappointment, there would be no leftover chicken sandwiches with tomato jam.

However, the tomato jam was delicious on a breakfast sandwich with a fried egg and some Italian cheese. Then later I used up the last bit of tomato jam on a pita with some hummus and spinach. I also think it would be lovely spooned over a block of cream cheese and spread onto crackers. You really can't go wrong!

Curtis suggests making a double batch of the tomato-basil butter, and therefore also the tomato jam, and I have to agree with him. Do yourself a favor and listen to his advice. The tomato jam is fabulous on sandwiches and the tomato-basil butter has endless uses. You can even freeze the butter so you can enjoy the lovely fresh flavors come winter time (yikes)! I promise you won't be sorry.


Whole Roasted Chicken with Tomato-Basil Butter
Adapted from What's For Dinner
by Curtis Stone
Serves 4

Tomato-Basil Butter
4 plum tomatoes (about 12 ounces total)
4 large sprigs of fresh thyme
3 garlic cloves, very coarsely chopped
2 tablespoons olive oil
salt and black pepper, to taste
1/4 cup coarsely chopped fresh basil
8 tablespoons (1 stick) butter, at room temperature

Chicken
One 4-1/2 pound chicken
3 carrots, coarsely chopped
1 onion, cut into 8 wedges
1 head garlic, halved horizontally
salt and black pepper, to taste
1/2 cup chicken broth

Preheat the oven to 375F. 

Make The Tomato-Basil Butter: In a large bowl, toss the tomatoes; thyme, and garlic with the olive oil. Season with salt and pepper. Arrange the tomatoes, with the thyme and garlic, on a large rimmed baking sheet. Roast for about 1 hour, or until the tomatoes are lightly browned. Remove from the oven and cool slightly; discard the thyme stems. Leave the oven on.

On a cutting board or in a food processor, finely chop the tomatoes and garlic. Transfer the tomato jam to a small bowl and mix in the basil. In a medium bowl, mix the butter and half of the tomato jam to blend. Season to taste with salt and pepper. Reserve the remaining tomato jam.

To Roast The Chicken: Using your fingers, starting at the neck end of the chicken, carefully make a pocket between the flesh and skin of the chicken breasts and top of the legs. Gently slide enough of the tomato butter inside the cavity of the chicken, then stuff the cavity with some of the carrots, celery, and onions and half of the garlic. Using kitchen twine, tie the legs of the chicken together. Tuck the wing tips behind the shoulders.

Place the remaining chopped vegetables in a medium roasting pan (or cast iron skillet). Spread the remaining tomato butter all over the chicken; set the chicken on the vegetables. Season the chicken with salt and pepper. Roast the chicken for about 1 hour and 20 minutes, or until an instant-read thermometer inserted into a thigh reads 160F. Transfer the chicken to a carving board to rest for about 15 minutes.

To Serve The Chicken: Meanwhile, discard the vegetables in the pan. Pour the pan juices into a measuring cup and spoon off the fat. Heat the pan over medium heat and add the broth and pan juices. Bring to a boil, scraping up the browned bits with a wooden spoon. Season with salt and pepper. Pour into a sauce boat. Carve the chicken and serve with the pan juices and tomato jam passed on the side. 


Theme: You Say Tomato, I Say Tomahto!

Thursday, July 14, 2016

Nigel Slater's Stir Fry of Broccoli and Lamb


We love a good stir fry in my house and it has been far too long since the last. It's no wonder then that Nigel Slater's Stir Fry of Broccoli and Lamb literally jumped off the page at me! Lamb stir fry? With our favorite veggie, broccoli? Why hadn't I thought of this before?

So happy I found this gem of a recipe because it was fabulous! The lamb was so succulent (a word I use a lot when cooking Nigel's recipes).  Flavorful and tender, it is the perfect base for the broccoli, garlic, and chilies.  However, the winning component of this dish was the sauce.   

A simple mixture of soy sauce, sugar and lime juice? How can that be so stinkin' delicious? Yet it totally makes this stir fry.  I poured the sauce on the stir fry as it was finishing and my entire family ran to the kitchen wondering what in the world smelled so good! The sauce coated the stir fry leaving behind glossy veggies and juicy bits of lamb. All the yummy browned bits from the bottom of the pan mingled with the stir fry to make one perfect dish.

Mouths drooled as I added white rice to the bowls and placed the stir fry on top.  It was hard to get pictures of this one. This dish needs little extra in the way of a garnish, but I enjoyed mine with a little extra cilantro and a drizzle of Sriracha to spice things up! Heavenly!


Stir-Fry of Broccoli & Lamb
Adapted from Tender
Serves 4

Broccoli - 2 large handfuls of florets
green onions - 6 whole
garlic - 6 plump cloves
3 hot red chilies
3 tablespoons canola oil
1 pound of ground lamb
a lime
2 tablespoons soy sauce
2 teaspoons sugar
handful of cilantro

Blanch the florets of broccoli in boiling water for one minute. Drain and set aside. Chop the green onions, removing the darkest green leaves as you go. Peel the garlic and chop it finely, then seed and chop the chilies. Get the oil really hot in a shallow pan or wok, then cook the onions, garlic, and chilies until soft but not colored, moving them quickly round the pan as you go. It will appear there is too much oil, but bear with me.

Add the ground lamb and let it color appetizingly. It should go a rich golden color. Add the drained broccoli. In a small bowl, mix the juice of the lime with the soy sauce and sugar. Add to the hot pan and let sizzle briefly, scraping at the gooey stickings on the bottom of the pan and stirring them in as you go. Check the seasoning - you may need a little salt - and stir in the cilantro.

Sunday, July 10, 2016

Grilled Corn On The Cob with Parsley and Garlic Brown Butter


Dear Curtis,

I sent my husband to the store for six fat ears of corn on the cob and he delivered.  I read through your recipe for Grilled Corn On The Cob with Parsley and Garlic Brown Butter and it seemed easy enough.  Full of motivation I proceeded to peel back the husk all the way, leaving it attached at the end. This was a little tricky and took a long time but I was still somewhat motivated to continue on with the recipe.

Twenty minutes later, I finished removing the silk and husking the corn. The husk was looking nicely arranged at the end of the cob. At this point I realized that my kitchen was a huge mess. Pieces of husk and cornsilk everywhere. Time for the corn to soak for an hour. Here is where I must ask you, what kind of object does one use to achieve this? I looked down at my six ears of fat corn with long husks hanging at the end and my mind went blank. Did I have anything big enough to hold all this?  Yes, but all the way in the back of my cabinet. It will take at least 10 minutes to dig it out. 

Beginning to get frustrated, I dig out everything in my cabinet looking for the pot big enough to hold the corn. Arrange the corn this way, doesn't fit.  Arrange the corn another way, doesn't fit. Smashed the corn into the container, threw on the lid, and threw a heavy cast iron pan on top to weight the lid down. Whatever, I say. It is what it is.

Blood rising, I had to clean the kitchen. Have you ever tried cleaning up cornsilk? It ain't easy, Curtis. Nearing a hissy fit I threw a stick of butter in the pan and proceeded making the brown butter sauce. I can do that. Easy enough. Butter melted, ingredients mixed in, and butter added back in fridge to harden up.

Finally the corn was done soaking and the butter was ready.  I must confess that I was totally over the corn by now. Who in their right mind works this hard to make a side dish? I felt like chucking the corn into the road, but I took it out to the grill. This is where the real fun began.

Husks everywhere, Curtis. Husks, everywhere. Too big for the grill, Curtis. The corn is almost impossible to turn. The husks are burning, Curtis. Why do I even have these husks on, Curtis? Do you know what burned husks do, Curtis? They turn into ash and disintegrate into one unbelievable mess. Why do you do this to me, Curtis? I thought we were friends.

I deem the corn charred and make my way back into the house. Wrestling with the brittle corn husks, I swear under my breath as I take pictures. Goodness sakes, Curtis. This corn is stressing me out. I'm starting to sweat and I hardly ever sweat, Curtis.

Frustrated beyond recognition I take a bite of the corn. It is delicious, Curtis. Almost worth all the frustration. Almost. The corn is sweet and juicy and the garlic butter is the perfect compliment to the corn. The squeeze of lemon adds just the right touch, brightening things up, and providing a fresh flavor. However, as I look down at my plate, the table, and the floor I notice burnt pieces of husk and ash.  Why, Curtis? Why do we need to leave the husk on the corn? Things would be so much easier if the husk was completely removed.

Thanks for the lesson, Curtis. It's been awhile since I learned a lesson the hard way. From this point on I will never, and I do mean never, leave the husks attached when I grill corn. Then I will truly be able to appreciate the deliciousness of this corn. Summer on a plate.

Sincerely,
Kim 


Grilled Corn On The Cob with Parsley and Garlic Brown Butter
Adapted from Curtis Stone Website
Serves 6

1/2 cup (1 stick) butter, room temperature
4 garlic cloves, finely chopped
1 tablespoon coarsely chopped fresh flat leaf parsley
1/2 lemon, juiced
6 ears fresh yellow corn with husks attached
salt and black pepper, to taste

To make the brown butter: Place a small heavy saucepan over medium heat. Add the butter and cook for 5 minutes or until the butter melts and becomes golden brown, swirling the pan occasionally.

Remove from the heat, stir in the garlic. Set aside until the butter is almost cold, then add the parsley and lemon juice. Place the butter mixture in a bowl and chill until the mixture is cold and firm.

To grill the corn: Fold back the husks from the corn cobs and remove the corn silk (keep the husks attached to the cobs). Soak the corn in a large bowl of cold water for 1 hour.  Drain and pat the corn dry.

Prepare the barbecue for medium heat:  Tear a few corn husks into long strips. Gather the husks at the base of a corn cob and tie them with the husk strips to secure. Repeat with the remaining corn cobs.

Spread the garlic butter all over the corn kernels. Sprinkle the corn kernels with salt and pepper. Place the corn on the grill. Cover and cook, turning occasionally, for 15 to 20 minutes, or until the corn is soft and juicy and the husks are lightly charred.

Theme: On The Barbie!

Sunday, July 3, 2016

Spanish Roasted Potatoes


You know how you have a friend for a very long time and you feel like you know pretty much everything there is to know about them? Then all of a sudden they surprise you with a statement, goes something like "I don't eat eggs." Or maybe "I don't like peanut butter."  Dumbfounded you sit there wondering how in the heck you didn't know this vital piece of information. You're a foodie after all. You take this seriously.  It's almost an offense.

These statements tend to slide by others without any concern at all, but I find myself somewhat baffled by these types of statements. You don't like eggs? How in the world can that be? You don't like peanut butter? Well then you must be crazy for certain. Not so long ago I had a friend tell me she didn't like rice. I was so perplexed by her statement it turned into a one hour debacle about how in the world you couldn't like rice. I think I even went so far as to tell her that she must be making it wrong because there was no way she couldn't like rice if it was made properly. I mean how can I know you for so long and all this time you were hating rice behind my back? Say what?

I guess I could understand if someone said they didn't like okra or oysters,  BUT eggs? Peanut butter? Rice? No way! Unacceptable! Of course, I say all this with a sense of humor, but I do really get baffled and feel the need to tease people when I hear that they don't like what I consider to be core foods.

Speaking of eggs, you are seriously missing out if you don't eat eggs. I could honestly put a fried egg on top of just about anything, except maybe chocolate, and call it a meal. These Spanish Roasted Potatoes, for example, would be even better with a glorious fried egg sitting on top. A little bit of egg yolk oozing out onto the potatoes? Right? Thank you for agreeing.

However, I will say that these potatoes really don't need anything extra. They were absolutely delicious and crave worthy as is. Crispy and coated with flavor on the outside and creamy and tender on the inside.  The half teaspoon of cayenne pepper lends a spiciness that is just about right, not too overwhelming. A little squeeze of lime over the potatoes does wonders to brighten up all the flavors. We gobbled these up in record time.

Now let's just hope no one tells me they don't like potatoes. I might very well jump outta my chair...


 Spanish Roasted Potatoes
Adapted from Curtis Stone Website
Serves 4-6
4 medium russet potatoes (about 3 pounds total), peeled
3 serrano chilies
1/2 cup olive oil
1 teaspoon coarse sea salt, plus more to taste
1 teaspoon smoked paprika
1/2 teaspoon cayenne pepper
1 tablespoon finely chopped fresh flat-leaf parsley

To parboil the potatoes: Bring a medium pot of water to a boil over high heat.

Add the whole peeled potatoes and cook for 12 to 15 minutes, or until the potatoes are almost cooked through but the center is still firm. To test for doneness, insert a small sharp knife into the center of the potatoes. It should meet with some resistance when inserted into the center of the potatoes.
Using a large slotted spoon, remove the potatoes from the boiling water and set them on a plate for 5 minutes to steam dry and cool slightly. Cut the potatoes crosswise into 3/4-inch-thick discs or wedges.

To roast the chilies:  Set the chilies directly over the burner flames on the stove and cook, turning as needed, until the skins are blistered and nearly black all over. Transfer the chilies to a bowl, cover with plastic wrap, and set aside until the chilies are cool enough to handle. Peel the chilies and then cut them into thin strips. Set the chilies aside.
To fry the potatoes: In each of 2 large nonstick frying pans, heat 1/4 cup of oil over medium-high heat.  Arrange the potatoes in a single layer in the pans, dividing equally to ensure you do not overcrowd the pan, as this will cause the potatoes to become soggy, not crisp and brown as desired. Sprinkle half the salt, paprika, and cayenne pepper over the potatoes. Cook for about 5 minutes, or until the potatoes are crisp and golden brown on the bottom. Turn the potatoes over and sprinkle with the remaining salt, paprika, and cayenne pepper. Cook for about 5 minutes, or until crisp and golden brown on the bottom and tender in the center. Stir in the chilies.
To serve:  Arrange the potatoes (also known as patatas bravas) on a small platter, sprinkle with parsley, and serve.


Theme: July Potluck!