Saturday, December 25, 2010

Breakfast Enchiladas and Christmas Wishes

I hope that all of you are having a wonderful Christmas!  My family and I are having a relaxing and fun day.  For the first time in many years we woke up to a White Christmas.  After opening up the presents, we bundled up and went outside.  The kids couldn't wait to try out their new mini four wheeler.  
After a long morning and lots of time out in the cold, we were all really hungry and enjoyed these Breakfast Enchiladas.    
The enchiladas were like a heartier and ultra-comforting step up from a breakfast burrito.  Ground sausage, eggs, green onion, cilantro and a green chile-pepperjack cheese sauce are enveloped in a flour tortilla and topped with more green chile-pepperjack cheese sauce.  This was the perfect, indulgent, and satisfying breakfast treat!  You can find the recipe HERE at Food.com.  This is a great breakfast if you need to feed a crowd of hungry people. 

I had a few recipes planned that I hoped to fit in before the holidays, but I ran out of time.  Tomorrow afternoon we are headed to Ohio to visit with my Dad and some friends.  I won't be able to visit or comment much, but wanted to wish all of you a very Merry Christmas and a Happy New Year!  Looking forward to seeing all of your tasty recipes next year!

Tuesday, December 21, 2010

A Comfort Food Feast: Giada's Pot Roast with Porcini Mushrooms, Herbed Cheese Polenta, and Brussels Sprouts with Pancetta

All you could hear was the sound of forks hitting plates.  No one said a word.  They were too busy shoving food in their mouths.  There was no talking, no drinking, and there was no one asking for salt, napkins, etc.  The food was inhaled.  The entire 4 pound roast.... gone in one sitting!  Everyone was so pleased with this meal that it was requested again, and soon. 

Thank you to all my wonderful blogging friends who pointed out Giada's recipe for Pot Roast with Porcini Mushrooms.  You sang it's praises, posted some astoundingly drool-worthy photos, and inspired me to make it for myself.  It was glorious.  It was delicious.  It was savory, tender, succulent.....and that sauce was out of this world.  Seriously one of the best pot roasts to ever touch my lips.  I will make it again and again.

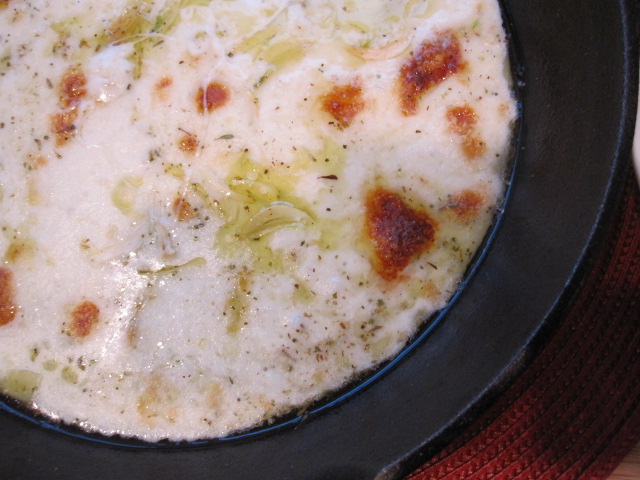
I won't lie.  The pot roast was infinitely better served atop this creamy, cheesy, sinfully rich Herbed Cheese Polenta
 And, because my nine-year old daughter has a new love for Brussels Sprouts, I made Giada's Brussels Sprouts with Pancetta.  A five-star veggie dish for sure!
 It was an extremely rewarding and comforting feast.  A welcome change from the quick meals and cookies that we've been eating all week.  If you're looking for a wonderful meal, here it is.  Be ready to dig in.  Try not to cry when you don't have any leftovers.
Pot Roast with Porcini Mushrooms
Adapted from Giada's Family Dinners
Serves 8-10, or maybe just 4
1 (5 pound) boneless beef chuck roast
salt and freshly ground black pepper
2 tablespoons olive oil
2 onions, chopped
6 garlic cloves, coarsely chopped
1 cup dry red wine
1-3/4 cups canned low-sodium beef broth (I didn't have broth on hand so I used water)
1/2 ounce dried Porcini Mushrooms
1 large spring of fresh rosemary (I also didn't have any rosemary, so I omitted this)
Preheat the oven to 350F.  Pat the beef dry with paper towels and sprinkle generously with salt and pepper.  Heat the oil in a heavy, 6-quart pot or Dutch oven over medium-high heat.  Add the beef and cook until browned on all sides, about 12 minutes.  (Don't rush this step, which is what creates the deep rich flavor in the finished dish.) Transfer the beef to a bowl.
Reduce the heat to medium.  Add the onions to the same pan and saute until tender, scraping up the brown bits on the bottom of the pot, about 5 minutes.  Add the garlic and saute for 1 minute.  Add the wine and boil for 1 minute.  Stir in the broth and mushrooms.  Return the beef to the pan and bring the liquids to a boil.  Cover the pot and transfer to the oven.  Braise until the beef is fork-tender, about 3 hours, turning the beef over halfway through.
Transfer the beef to a cutting board.  Tent with foil and let stand for 15 minutes.  Meanwhile, spoon any excess fat off the top of the pan juices.  Transfer the pan juices and vegetables to a blender and puree until smooth.  In a medium, heavy saucepan, combine the sauce and rosemary sprig.  Bring to a boil, then season the sauce to taste with salt and pepper.
Cut the beef across the grain into 1/2-inch-thick slices.  Arrange the sliced beef on a platter.  Spoon some of the sauce over and serve, passing the remaining sauce in a gravy boat.


Herbed Cheese Polenta
Adapted from Giada's Family Dinners
8-10 servings
9 cups water (I added up to a cup more when the polenta became too thick)
1 tablespoon salt
2-1/2 cups yellow cornmeal or polenta
1-1/2 cups freshly grated Parmesan cheese
1-1/2 cups whole milk (I used half and half)
10 tablespoons (1-1/2 sticks) unsalted butter, cut into chunks
1/3 cup chopped fresh flat-leaf parsley
1 tablespoon finely chopped fresh rosemary (left out just because I didn't have any)
1 tabelspoon chopped fresh thyme
3/4 teaspoon freshly ground black pepper
Bring the water to a boil in a large, heavy pot.  Add the salt.  Gradually whisk in the cornmeal..  Reduce the heat to low and cook, stirring often, until the mixture thickens and the cornmeal is tender, about 15 minutes.  Remove from the heat.  Add the cheese, milk, butter, herbs, and pepper.  Stir until the butter and cheese melt.  Transfer the polenta to a bowl and serve.

In the interest of not writing a book, the recipe for the Brussels Sprouts with Pancetta can be found HERE, you will be redirected to the Food Network.

Notes/Results:  Absolutely amazing!!  Just a couple things to share.  I was really upset when I found that I didn't have the beef broth to make the roast, but I ended up subbing water and found the end result was still fantastic.  I halved the recipe for the polenta, which worked out great.  I subbed half and half for whole milk just because it was what I had on hand.  I added about 1 extra cup of water to the polenta while is was cooking.  I found that the polenta was too thick as the recipe was written.  All in all, a couple of subs and additions, but the end result of all three recipes was fabulous.  All three recipes are keepers!
Cooking the recipes of Giada De Laurentiis

Monday, December 20, 2010

Ina Garten's Baked Cheese

The first recipe that screamed to me from the pages of Ina Garten's How Easy is That?, was her Baked Fontina.  I was seduced by the gloriously melted cheese and had to have it.   
Baked Fontina, aka Baked Mozzarella
Adapted from Ina Garten's How Easy Is That?
Serves 4-6
1-1/2 pounds Italian Fontina Val d'Aosta cheese, rind removed and 1-inch diced (*I ended up using an equal amount of fresh mozzarella, more on that later)
1/4 cup good olive oil
6 garlic cloves, thinly sliced
1 tablespoon minced fresh thyme leaves
1 teaspoon minced fresh rosemary leaves
1 teaspoon kosher salt
1 teaspoon freshly ground black pepper
1 crusty French baguette

Preheat the broiler and position the oven rack 5 inches from the heat.

Distribute the cubes of Fontina (or mozzarella in my case) evenly in a 12-inch cast-iron pan.  Drizzle on the olive oil.  Combine the garlic, thyme, and rosemary and sprinkle it over the cheese and olive oil.  Sprinkle with the salt and pepper and place the pan under the broiler for 6 minutes, until the cheese is melted and bubbling and starts to brown.

Serve the baked Fontina (mozzarella) family-style - right out of the oven in the cast-iron pan with crusty chunks of bread for everyone to dip.

Notes/Results:  Ina recommended the Fontina Val d'Aosta, so I hightailed it to the city and bought roughly 1/2 pound ($11 for just 1/2 pound).  A couple of days later, I went to make this and opened up my package of Fontina Val d'Aosta.  The smell of the cheese was extremely offensive - extremely! It was so bad that I had to wrap it up and take it outside immediately.  I bought the Fontina from a reputable store, but somewhere along the line the cheese had definitely gone bad.  I had my heart set on a glorious pot of melted cheese, so I took out some fresh mozzarella and went ahead with the recipe.  I'm sure Ina's recommendation for the Fontina Val d'Aosta is fabulous, and I'll definitely give it another try, but the fresh mozzarella worked wonderfully too! I think you could easily adapt this one to use a lot of different cheeses.  I served my Baked Mozzarella with some chunky bread and sliced pepperoni.  Lips were smacking, mouths were happy, and all was fabulous!


Special Note:  If anyone has had Fontina Val d'Aosta, I'd love to hear about it.  I'm sure it's a wonderful cheese and am convinced I just bought a bad piece.
 
Yum!  Bring on the ooey gooey cheese!


Sunday, December 19, 2010

Michael Symon's Risotto with Bay Scallops and Spinach Salad with Fried Egg, Bacon, and Morels

Risotto is one of those dishes that reminds me of my love for cooking.  A labor of love, it cannot be left alone to tend to itself.  You have to pour your heart into it, stirring and stirring all the while.  You don't answer the door.  You don't answer the phone.  You stir, you daydream, you get lost in the recipe.  It's just you, your pot and that wooden spoon.  Tune the world out.....

That isn't the only reason risotto is one of my go-to meals. Risotto is also a cook's dream.  It can be a grand meal with fresh seafood and glorious cuts of meat or it can be a clean-out-the fridge kind of meal.  Either way, if you have a box of Arborio or Nano Rice, then you most likely have the makings for an impressive meal.  A little aromatics, some stock, leftover bits of cheese, veggies, meats...... you're good to go!

Michael Symon's risotto was the first time I've added prosciutto to risotto and I loved it.  Creamy and delicious with chunks of tender scallops and prosciutto...a beautiful meal.


Risotto with Bay Scallops
Adapted from Michael Symon's Live To Cook
Serves 4
2 tablespoons olive oil
1 medium yellow onion, minced
2 garlic cloves, minced
1/2 cup diced prosciutto
1 cup Arborio rice
1 generous pinch saffron (didn't have any on hand, so I left it out)
1/2 cup dry white wine
3-4 cups chicken stock, warmed
1/2 pound bay scallops, or 1/2 pound sea scallops cut into 1/2-inch pieces
1/4 cup sliced fresh flat-leaf parsley leaves
1 tablespoon unsalted butter
2 tablespoons grated Parmesan

Heat the olive oil in a 4-quart saucepan over medium heat.  Add the onion and sweat it for 2 minutes.  Add the garlic and sweat it for 2 minutes  more.  Add the prosciutto and cook it until it crisps, about 1 minute.  Add the rice and let it toast slightly in the hot fat, about 1 minute, stirring with a wooden spoon.

Reduce the heat to low, add the saffron and wine, and stir continuously until most of the wine has cooked off.  Add 1 cup of the stock and stir continuously until the liquid has cooked off, about 3 minutes.  Add another cup of stock and repeat the process.  Taste the rice.  Continue to add stock in 1/4-cup increments until the rice is tender and the risotto is creamy.

Add the scallops and continue to stir for 2 minutes, or until the scallops are heated through.  Remove the pan from the heat and stir in the parsley, butter, and cheese and serve immediately.
Spinach Salad with Fried Egg, Bacon, and Mushrooms
Adapted from Michael Symon's Live To Cook
Serves 4
2 teaspoons extra virgin olive oil, or more as needed
8 ounces slab bacon, cut into 1-inch by 1/4 inch pieces
1 shallot, thinly sliced
6 ounces morel mushrooms, halved if large (I used baby bellas)
1/2 cup chicken stock or water
6 tablespoons balsamic vinegar, or more to taste
4 large eggs
Kosher salt and freshly ground black pepper
8 ounces fresh spinach leaves (about 8 cups loosely packed), stemmed

Heat a saute pan glazed with 1 teaspoon of the olive oil over medium-high heat.  Add the bacon pieces and saute them until they develop a crispy exterior but remain tender on the inside, adjusting the heat as necessary, 5-10 minutes.  Add the shallot and saute until it is translucent, another minute or two.  Add the mushrooms, and once they begin to soften, after about 2 minutes, add the stock, scraping the browned bits from the bottom of the pan as the liquid comes to a boil.  Reduce the pan liquid by half.  Add the balsamic vinegar, bring to a simmer, and then remove the pan from the heat.  Taste the pan sauce looking for a proper balance of fat and acidity.  If the sauce taste too fatty, add another dash of balsamic.  If it's too acidic, correct it with additional extra-virgin olive oil.

Heat a large nonstick pan over medium-low heat.  Glaze the pan with the remaining teaspoon of olive oil and crack in the eggs, taking care not to break the yolks.  Season each egg with a pinch of salt and some black pepper.  Fry the eggs gently until the whites are cooked through but the yolks remain runny.

Place the spinach in a large bowl.  Pour the warm dressing, with the bacon and morels (mushrooms), over the spinach and toss until the leaves are wilted and coated.

Divide the spinach salad among four plates and top each with a fried egg.
 
Trying to play catch up with the Symon Sundays group, I made his Sweet Corn and Wild Mushroom Soup.   The star of this soup is the corn cob stock, so fragrant and wonderful.  I had never made corn cob stock up until this point and I  must tell you that it is fabulous.  I'll be saving all my corn cobs from now on.  You can find the recipe for the corn cob stock, as well as the Sweet Corn and Wild Mushroom Soup here on Joanne's site, Eats Well With Others.
  
With some leftover rotisserie chicken, I made Symon's Mac and Cheese with Roasted Chicken, Goat Cheese, and Rosemary.  Quite possibly the easiest Symon recipe yet, it was absolutely creamy, indulgent, and incredible.  I highly recommend this one.  The recipe can be found at Natashya's site, Living in the Kitchen with Puppies, by clicking here.

Thursday, December 16, 2010

Playing Catch Up....Hits and Misses

In the past month I've done a lot of cooking, more so than usual.  It's almost inevitable that you're going to have some hits and misses along the way. In the interest of playing catch up this post is going to be a mix of recipes, some that we enjoyed, others not so much.

See that Tres Leches Cake above?  I was curious about Tres Leches for a long time. The concept of a cake soaked in three milks and iced in whipped cream?  Hello!  Sign me up for that!  I used the recipe from Pioneer Woman's site and made this cake for our Mexican-Inspired Thanksgiving.  PW's recipe worked great and the cake went together just fine.  The end result was a big surprise to me.

The overall recipe was fine, but it was just a miss for us.  We ate it, but didn't love it.  We found the cake to be light, which was nice, but a little too on the mild side.  I'm sure this recipe would be great for some, just not us.  Tres Leches Cake has been a recipe on my to-do list for a long time now and I'm happy to say that I've made one.  It really doesn't hurt my feelings, or my thighs for that matter, that I didn't love it.  More room for other desserts, right?   
Another miss were these Pumpkin Doughnut Muffins from Everyday Food.  If you've read my blog for the past few months then you know that I love my Everyday Food magazine.  All of their recipes have been big hits in my house, but surprisingly these Pumpkin Doughnut Muffins just fell flat.  The muffins were lacking in pumpkin flavor and were surprisingly dry, even though they contained buttermilk, which almost always ensures a moist baked good.  I very rarely make things and toss them, but I tossed these.  They just weren't worth the calories.  I still love you Everyday Food!
It's about time for a hit, right?  Well, I was fortunate enough to receive a copy of Ina Garten's How Easy Is That? for my birthday a few months ago.  The first recipe I chose to make was Jeffrey's Roast Chicken.  I chose this recipe because I knew it would be delicious.  I also chose it in good fun.  Ina Garten happens to be one of the only chefs on the Food Network that my husband will watch with me.  He loves to joke about how much she spoils Jeffrey, and he's right.  Ina sure does love her husband. Saying that, Ina can also make a mean roast chicken.  This chicken was delicious and made a wonderfully flavorful sauce, which went very well with this..................
Potato risotto!  Genius, right?  If you haven't been watching Chuck Hughes on the Cooking Channel, then you need to get started.  He has a winning personality, big passion for food, and he's extremely easy on the eyes!  I love, love, love his show.  This potato risotto was the first thing I ever saw him make on his show and I thought it was brilliant.  Cubes of potato are cooked down in a skillet, just like real risotto, then mixed with cheese, mushrooms, or anything else you want to add.  Chuck serves his with sausage on top (sounds fantastic), but I served mine with Ina's chicken. You can find the recipe here, on the Cooking Channel site. 

Yum - Jeffrey's Roast Chicken with that beautiful sauce and cheesy potato risotto!  Hit! Hit! Hit!

Now back to reality with Trisha Yearwood's Peanut Butter Bars.  I'm afraid they're another miss.  Yep, you heard me right. Yes, peanut butter and chocolate are two of my biggest loves.  Yes, I love my copy of Trisha's newest book.  Can I file this one under the word "strange".  It does sound strange to say that I didn't like these, right?  I can't put my finger on why.  What I can tell you is that I've never, ever disliked anything with peanut butter and chocolate until I had these.  Dare I say they were too peanut buttery?  I'm not sure if there is such a thing or not, but these just weren't good.
And now....I'm going to leave you with something crazy.  Taste of Home called them Gourmet Scrambled Eggs.  Wanna know the secret ingredient?  Mayonnaise.  It sounds crazy, right?  Well, I heard of mixing all kinds of things into eggs, but never mayo.  I had to try it.  The eggs were good, although not the best I've had.  No one could taste the mayo and it was a fun recipe to try.  The ratio is basically 8 eggs to 1/4 cup mayo.  If you're interested you can find the recipe here.  This one was really neither a hit or miss, just kinda crazy.

Some hits and some misses.   It may sound strange, but I do enjoy an occasional miss here and there.  It's never really a bad thing when you learn what you like, as well as what you don't like. 

Happy Cooking!

Monday, December 13, 2010

Apricot and Nut Cookies with Amaretto Icing

This cookie recipe is one that I wanted to make as soon as I first set eyes on it.  I knew I could count on it to be different and unique, not to mention, perfect for adults.  It can't all be about the kids, can it? 

When my friend Barbara over at Moveable Feasts pointed this cookie out and announced that it was the most asked for cookie in her house, well.....I took note.  How could I not?  Let me just tell you, Barbara was right.  This is one delicious cookie.
Wonderfully chewy from the apricots, nutty from both the pine nuts and sliced almonds, and don't forget about the very best part.....Amaretto icing.  Wow - that icing!  I ate it with a spoon.  You would do the same thing, right? 
This cookie is really special and is going to be a new favorite around here.  I'm going to make another batch later today.  Try it if you're in the mood for something different.  
I couldn't resist showing you all that chewy apricoty goodness that lies underneath that delectable  icing.  The apricots are perfectly delicious, but I'm also thinking dried cherries would be a good option.  
Apricot and Nut Cookies with Amaretto Icing
Adapted from Giada at Home
Makes 2 to 2-1/2 dozen cookies

1/2 cup (1 stick) unsalted butter, at room temp
1/2 cup plus 2 tablespoons granulated sugar
1 teaspoon pure vanilla extract
1/4 teaspoon ground cinnamon
1/4 teaspoon fine sea salt
1 large egg
1-1/4 cups all purpose flour
1/2 cup dried apricots, coarsely chopped
1/4 cup slivered almonds, toasted
2 tablespoons pine nuts, toasted
1-3/4 cups confectioners' sugar
5-7 tablespoons Amaretto or other almond flavored liqueur

In a large bowl, beat the butter, granulated sugar, vanilla extract, cinnamon, and salt with an electric mixer until light and fluffy, about 2 minutes.  Beat in the egg.  Stir in the flour until just blended.  Mix in the apricots, almonds, and pine nuts.

Transfer the dough to a sheet of plastic wrap and shape into a log, about 12 inches long and 1-1/2 inches in diameter.  Wrap the dough in the plastic and refrigerate for 2 hours.

Preheat the oven to 350F.  Line 2 heavy baking sheets with parchment paper.

Cut dough log crosswise into 1/4 to 1/2 inch thick slices.  Transfer the cookies to the prepared baking sheets, spacing them 2 inches apart.  Bake until cookies are golden around the edges, about 15 minutes.  Transfer the cookies to a wire rack to cool completely before icing.

To ice the cookies, pour the confectioners' sugar in a medium mixing bowl.  Gradually whisk in the Amaretto until the mixture is just thin enough to drizzle.

Place the wire rack with the cookies on it over a baking sheet.  Using a spoon or fork, drizzle the cookies with the icing, allowing any excess icing to drip onto the baking sheet.  Allow the icing to set before serving at least 30 minutes.

Notes/Results:  Absolutely wonderful.  A great addition to any cookie plate and a special treat for the adults.  I think this is a terrific recipe to play around with and would love to try these cookies with dried cherries, possibly cranberries.  I'm sure there are quite a few variations that would be great.  I do want to mention that this recipe makes a lot of Amaretto icing.  I really poured the icing on my cookies and had about half of the icing leftover.  This works out great for me since I'm making another batch, but I would reduce the icing in half if only making one batch. 
What's on Your Cookie Plate @ IHCC

Friday, December 10, 2010

Mozzarella, Strawberry, and Brown Sugar Panini

Curiosity.   It's a funny thing.  It raises burning questions.  Burning questions like do jam and mozzarella really go together?  Rosemary and jam?  Brown sugar and cheese.......hmm.  Before we know it, we are knee deep in wonder and it's too late to turn back.  That curiosity, it gets the best of us. Keeps us doing things we might not otherwise do....
Mozzarella, Strawberry, and Brown Sugar Panini
Adapted from Giada at Home
4 servings
8 (1/2-inch-thick) slices bakery-style white bread
1/4 cup olive oil
1/2 cup raspberry jam (I used strawberry)
2 teaspoons chopped fresh rosemary leaves (I used basil)
8 ounces fresh mozzarella cheese, drained and patted dry
salt (optional)
2 tablespoons light brown sugar

Preheat the panini press or indoor grill.  

Using a pastry brush, brush the bread on both sides with the oil.  Spread one side of each slice of bread with the raspberry (strawberry) jam.  Sprinkle the rosemary (basil) over the jam.  Cut the mozzarella cheese into 8 slices.  Place 2 slices of cheese on each of 4 of the bread slices.  Season the cheese with a pinch of salt, if using.  Place the remaining slices of bread on top, jam side down.  Sprinkle the tops with the brown sugar.

Grill the panini for 3 to 5 minutes, until the cheese has melted and the bread is golden and crispy.  Cut the panini in half and serve.

Cook's Note: If you do not have a panini press or indoor grill, use a ridged grill pan:  Preheat the pan, add the sandwiches (in batches; if necessary), and put a weight (such as a brick wrapped in aluminum foil or heavy cast iron skillet) on top to press them down.  Grill for 2-3 minutes to brown the first side, flip the sandwich, replace the weight, and grill for 2-3 minutes to brown the other side and finish melting the cheese. 

Notes/Results:  All of the components actually come together really nicely in this sandwich.  The mozzarella was buttery and creamy, the strawberry jam is nice and sweet, and the brown sugar crusted bread.....whoa mama!  That crispy, crunchy, sugary, caramelized bread was some good stuff, the hit of the sandwich if you ask me.  This is one of those recipes that stays on your mind and keeps you thinking, which is good for the mind, if you ask me!

Making it Simple with IHCC

For Deb @ Kahakai Kitchen
For Brenda @ Brenda's Canadian Kitchen

Wednesday, December 8, 2010

Mexican Tortilla Salad with Cotija Cheese and Cilantro-Pepita Dressing

The original name for this salad was Mexican Caesar Salad and I had a few issues with that.  To begin with, Caesar salad originated in Mexico so the title was a bit redundant.  Secondly, it really doesn't resemble a Caesar Salad - does it?  In the end I decided to rename it Mexican Tortilla Salad with Cotija Cheese and Cilantro-Pepita Dressing.  My new title is a bit long, but I think it's suits the salad better, at least that's what I'm telling myself.

Either way,  this is a fun and unique salad that was a big hit at our Mexican-Inspired Thanksgiving this year.  This salad paired very well with Marcela Valladolid's Jalapeno Roasted Chicken, as well as her Chile and Cheese Rice.  (Both Marcela's Jalapeno Roasted Chicken and her Chile Cheese Rice happen to be two of my favorite new recipes this year).  If you're looking for a wonderful family meal with lots of flavor and a hint of spice, this makes for a great menu.


Mexican Tortilla Salad with Cotija Cheese and Cilantro-Pepita Dressing

Adapted from Food.com
Salad:
4 corn tortillas
2 heads of Romain lettuce, cut into chunks
1/3 cup crumbled Cotija Cheese
1 roasted red pepper
1/2 cup roasted pepitas (shelled pumpkin seeds)
Dressing:
1- 4oz. can chopped green chiles
2 tablespoons roasted pepitas (*see above)
1 garlic clove
dash black pepper
1/4 teaspoon salt
1/3 cup olive oil
1 tablespoon lime juice
1 tablespoon Cotija cheese
1/2 bunch fresh cilantro
3 tablespoons mayo
2 tablespoons water 
Place all dressing ingredients except cilantro, mayo and water in a blender or food processor. blend approx 10 sec., then add cilantro, mayo and water and blend until combined .  Place in an airtight container and refrigerate, will keep for 3 days.
Cut tortillas into match sized sticks. Heat oil in saute pan over med-high; fry tortillas until crisp. Remove with slotted spoon and drain on paper towels. Set aside.

Tear lettuce into bite size pieces, toss in large bowl with half of the crumbled cheese, roasted peppers, pepitas and as much salad dressing as you wish. Top with the remaining cheese, roasted peppers, pepitas and fried tortilla strips.  
NOTE***Cojita is a hard and crumbly cheese, similar in texture to feta, found in some grocery stores and most mexican markets.

Notes/Results:  My Mom and I loved this salad with it's creamy and colorful dressing, chunks of Cotija cheese, and crunchy strips of tortilla strips and pepitas.  I didn't have any red peppers on hand, so I wasn't able to include the roasted red pepper strips, but I imagine that the red color of the peppers would make for a stunning red and green salad this holiday season.  This salad would be equally delicious as a main dish with added vegetables, sliced chicken or maybe even shrimp.  This is one of those salad recipes that people will remember, crave, and ask for again. 

For my friend Deb @ Kahakai Kitchen

Monday, December 6, 2010

Penne Gorgonzola with Chicken

Can you imagine how it would feel to win $25,000 for one of your recipes? Forget the money for a minute...wouldn't that be the ultimate compliment? This recipe for Penne Gorgonzola with Chicken was Taste of Home's biggest grand prize winner ever. I first saw it over on my friend Lara's site, Recipe Shoebox. I knew instantly that it would be a hit at my house. I just wish I had made it sooner.

This recipe is everything that good comfort food should be: creamy, cheesy, flavorful, and downright lip-smacking good. It's the kind of food where you go back for more, not because you're hungry, but because it's so darn good. If you're a fan of blue cheese, please make this recipe. I promise that you won't be sorry.
Penne Gorgonzola with Chicken
Adapted from Taste of Home Magazine
Time:30 minutes
Serves: 8
1 pound penne pasta
1 pound boneless skinless chicken breasts, cut into 1/2" pieces (I used rotisserie chicken)
1 tablespoon olive oil
1 large garlic cloves, minced (I used 2 cloves)
1/4 cup white wine
1 cup heavy whipping cream
1/4 cup chicken broth
2 cups (8 ounces) crumbled Gorgonzola cheese
6-8 fresh sage leaves, thinly sliced
salt and pepper to taste
Grated Parmigiano-Reggiano cheese or minced fresh parsley

Cook the pasta to according to package directions. While pasta is cooking, make the sauce.

Meanwhile, in a large skillet over medium heat, brown chicken in oil on all sides. Add garlic; cook 1 minute longer. Add wine, stirring to loosen browned bits from pan. (Note: I used leftover rotisserie chicken and just added the chicken to the sauce at the end until it was warmed through).

Add cream and broth; cook until sauce is slightly thickened and chicken is no longer pink. Stir in the Gorgonzola cheese , sage, salt and pepper; cook just until cheese is melted.

Drain pasta; toss with sauce. Sprinkle with Parmigiano-Reggiano cheese and parsley.
Notes/Results: This was one of those recipes where I knew it was going to be good, but was surprised by just how good it was. I loved it! When I first started making the sauce I was a little worried about adding 2 cups of Gorgonzola. I was afraid the Gorgonzola would take over and be too powerful, but it didn't. While most creamy pasta recipes are on the bland side, this recipe was perfectly flavorful with fairly subtle hints of the Gorgonzola. I was also happy that I used leftover chicken to make this recipe. Don't get me wrong. I would've loved to have the browned bits from freshly cooked chicken, but I think I preferred the softer texture of the rotisserie chicken in this recipe. This recipe truly does make enough for 8 full servings and would be great at a dinner party or to serve a crowd. This is one of those keeper recipes that I will make again and again.

Saturday, December 4, 2010

Pancetta and Cinnamon Waffles


I love waking up to a blanket of snow on the ground, watching the snowflakes hit the ground. The snow is like a blanket of magic and wonder, so pretty and captivating. On mornings like this, I love to open up my blinds and watch the falling snow as I cook in the peace and quiet of winter, one of my favorite seasons. The falling snow gives me all the reason I need to whip up a hearty breakfast, one that will warm the belly and fill the soul.

I'm talking about a full-on, carb-loving, food-coma-inducing plate full of Pancetta and Cinnamon Waffles. Yep! Grab a pillow-- because if you eat one, you're either going to be taking a nap or laying on the couch. Save playing in the snow for another day.

Pancetta and Cinnamon Waffles
Adapted from Giada At Home
Serves 4-6, depending on serving size
1/2 cup chopped walnuts
1 tablespoon olive oil
3 (4 ounce) slices of pancetta, each about 1/4 inch thick, diced into 1/4 pieces
3 cups Belgian Waffle Mix, such as Krusteaz
2 large eggs
1/3 cup vegetable oil for the waffles, plus more for the waffle iron
1-1/2 teaspoons ground cinnamon
1/2 teaspoon salt

Preheat the oven to 350F.

Spread the walnuts in an even layer on a rimmed baking sheet. Bake for 10 to 12 minutes, until toasted and fragrant. Set aside to cool.

Preheat and lightly grease a waffle iron.

Heat the olive oil in a medium skillet over medium-high heat. Add the pancetta and cook until brown and crispy, 3-5 minutes. Transfer the pancetta to a paper towel-lined plate to cool.

In a large mixing bowl, combine the waffle mix, eggs, vegetable oil, 1-1/2 cups water, the cinnamon, and salt. Using a whisk, blend the ingredients together until smooth. Stir in the pancetta. Pour batter, using the amount recommended by the waffle iron manufacturer's instructions, into the preheated waffle iron. Cook waffles for 3-4 minutes, or until golden brown.

Place the waffles onto serving plates. Sprinkle with the chopped walnuts and drizzle with the maple syrup. Serve immediately.

Notes/Results: These waffles are a real treat. Chock full of pancetta and perfectly spiced with cinnamon, they are the perfect way to start a lazy day. (Not that I would know anything about a lazy day). You believe me, right?

I Heart Cooking Clubs now celebrating the recipes of Giada De Laurentiis.

Also for Brenda's Cookbook Sundays event over @Brenda's Canadian Kitchen.

Last, but not least, for Roz @ La Bella Vita for her Fresh Fridays/Seasonal Saturdays event, which is open for the rest of the week.

Note: I've been getting messages that readers are unable to leave me comments. I'm not sure why this is happening. I have been getting this error message every time I try to publish a post. Anyone have any idea what that's all about? If you do, please shoot me an email at tony.tracy@att.net.

Your HTML cannot be accepted: Closing tag has no matching opening tag: A

Stop showing HTML errors for the body of this post

Friday, December 3, 2010

Asian Turkey Meatballs with Carrot Rice... and a favorite food tip!


I was drawn to this recipe as soon as I first set eyes on it. I couldn't wait to give it a try, so I made it the very next night and fell in love. These are some tasty, flavor-packed meatballs folks. Good stuff! The meatballs are loaded with fun flavors like green onion, cilantro, soy sauce or fish sauce, Sriracha, garlic and just a hint of sugar. Yum! Just thinking about them has me craving them all over again.

I had to share the picture above so you could see all the flavors going into the meatballs above. If you don't care for ground turkey, you can also use ground pork.

Asian Turkey Meatballs with Carrot Rice
Everyday Food Issue 77, page 14
Serves 4
Coarse salt
1 cup long-grain white rice
1 carrot, shredded
3/4 cup breadcrumbs
1-1/2 pounds ground dark meat turkey or ground pork (I used only one pound)
3 scallions, white and green parts separated and thinly sliced
1/3 cup chopped fresh cilantro leaves
4 teaspoons fish sauce (I substituted soy sauce)
4 teaspoons hot-pepper sauce (preferably Sriracha)
4 teaspoons sguar
1 large garlic clove, minced (I used 2 good-sized cloves)
2 teaspoons vegetable oil (will not need if you bake your meatballs)
lime wedges, for serving

Preheat oven to 450F. In a medium saucepan, bring 1-1/2 cups salted water to a boil. Add rice, stir, and return to a boil. Cover, reduce to a simmer, and cook until rice is tender, about 15 minutes. Remove from heat and top with carrot. Let stand, covered, 5 minutes, then stir in carrot and fluff rice with a fork.

Meanwhile, in a medium bowl, combine breadcrumbs and 3 tablespoons water. Let stand 5 minutes. Add turkey, scallion whites, cilantro, fish/soy sauce, hot-pepper sauce, sugar, garlic and 1-1/2 teaspoon salt. Gently mix to combine and form 12 meatballs (I got about 17 meatballs).

In a large nonstick skillet, heat 1 teaspoon oil over medium-high. In batches, brown meatballs on all sides, 10 minutes total (add up to 1 tsp. oil as needed). Transfer to a rimmed baking sheet and bake until cooked through, 10 minutes. Serve meatballs with rice, scallion greens, and lime wedges. (NOTE: I baked my meatballs on a lightly oiled baking sheet at 350F for about 25 minutes)

Notes/Results: Before I called everyone to dinner, I grabbed a meatball off the tray and gave it a try. It was so good that I snuck another one. I started to have thoughts of running away with the tray, but thought better of it. Saying that,these meatballs would be great served on their own, with or without a dipping sauce. They also made for a wonderful meal with the rice. One more reason why Everyday Food by Martha Stewart is my absolute favorite cooking magazine.
Favorite Food Tip: Maybe you've heard this one before, maybe you haven't. Either way, I think it's really cool. Did you know that green onions can regenerate if you put them in a glass of water? I just learned this tip about a month ago and think it's the coolest thing. After cutting off the green tops, just place the white stems in a glass/jar of water and place on your windowsill. Within a day you will notice quite a bit of green growing from the tops of the stems. The green portion grows at about the rate of almost an inch per day. In less than one week, your green onions in the jar will look just like the ones at the store. Call me silly, but I get a big kick out of that. You can continue to cut them back and do this about 4-5 more times. After about the 4th cut, the green portion starts to get a bit soft and it's time to toss them out and start over. Green onions are inexpensive and all, but it really is fun to watch them regenerate on your windowsill. Best of all, it takes little to no effort and it's nice to always have a bit of green to add to your dishes!

Wednesday, December 1, 2010

Thanksgiving Dinner Burger Roundup


At the beginning of last month I announced the Thanksgiving Dinner Burger Challenge and invited all of you to create your own Thanksgiving-inspired burgers. Here are the results and let me just say, they are impressive!

Get ready to lick your chops!

Natashya of Living in the Kitchen with Puppies put together ingredients she had on hand to create one killer Thanksgiving Dinner Burger. Now this is a burger I'd like to sink my teeth into!

Natashya's turkey burger is flavored with onion, diced apple, thyme and sage, then placed atop a homemade stuffing-inspired Sage and Celery Bun and topped with a savory mushroom gravy, cranberry sauce, and spinach. Wow! A little savory, a little sweet, a whole lot of deliciousness!


To celebrate her 300th post, Teresa from A Blog About Food, made The Best Turkey Burger Ever. You can tell how tender and moist the burger is just by looking at it!

Teresa's turkey burgers were flavored with Dijon mustard, garlic, scallions, and Gruyere cheese, then topped with sauteed mushrooms and blue cheese. This burger is packed with some of my all-time favorite ingredients. I'm on my way, Teresa!

Deb of Kahakai Kitchen , a girl after my own heart, modeled her "Spectacular Side Dish Turkey Sliders" after her favorite component of Thanksgiving dinner: the stuffing. Sounds like a good idea to me!

Deb chose to incorporate all the flavors of her Mom's stuffing into her slider patties. She pulled big flavors, like onion, garlic, celery, apple, various herbs, and red pepper flakes, then topped the sliders with a homemade lemon-sage mayo, brussels sprouts, cranberry sauce and served them on potato rolls. You know those were some flavor-packed burgers!

All the way from Ireland, I am very happy that Eleanor of BrownievilleGirl chose to join us with her Thanksgiving Burger. Eleanor holds the key to my heart with her secret weapon, Wensleydale cheese with cranberries. Genius!

The Wensleydale cheese with cranberries is such a treat and I'm so glad that Eleanor elected to use it in her burger. If you haven't tried this cheese, you should. It's a very fun treat for the upcoming holidays.

Eleanor stuffed the inside of her turkey burgers with the Wensleydale cheese and topped them off with a very pretty-in-pink cranberry mayo. I think Eleanor has this Thanksgiving business down to a "T". Great job, Eleanor!

Here at Stirring the Pot, my first Thanksgiving Dinner Burgers, were inspired by sausage stuffing, which is also my favorite part of a traditional Thanksgiving menu.

My turkey burgers were a combination of turkey, sausage, grated apple, and sage and were topped with baked creamed pearl onions and spinach. I served my burgers on King Arthur's stuffing buns. We enjoyed the turkey/sausage patties immensely, loved the baked creamed pearl onions, but didn't really care for the King Arthur stuffing buns.

I still had a package of cranberries and wanted to incorporate them into a burger, so I made these Turkey Burger Crostini with Camembert and Cranberry-Jalapeno Relish. They were the perfect thing to serve at our tree-trimming party tonight.

Obsessed with the idea of cranberry mayo, I ended up mixing some into the ground turkey for these mini burgers. I layered a slice of Camembert on the crostini and allowed it to melt slightly, then topped it with the mini burger and a dollop of cranberry-jalapeno relish. They were perfect little bites, with lots of tastes and texture.

A HUGE thank you to everyone who participated in the Thanksgiving Dinner Burger Challenge. It was so much fun to read about your burgers and see the final outcome. I loved them all and am so happy that each of you took the time to share them!

The links for each burger are provided above in case you'd like to read the individual posts and get the recipes.

If I left anyone out, please leave a comment letting me know. I'd be happy to add you to the roundup!

Finally, as I was typing up the roundup I was thinking about how cool food blogging really is. In this roundup alone, there are 3 different countries represented: Ireland, Canada, and America. That's pretty awesome, isn't it? Not to mention that most of us blog internationally on a daily basis. We rarely stop to think about those things, but it truly is amazing! What a privilege it is to meet people from all over the world who share the same passion. Definitely something to be thankful for!